Raise your hand ??if any of the following has happened to you within the past 6 months:
- You opened an email and read it but (gulp) forgot to respond to it
- You purchased a teaching resource on TpT or elsewhere…and then completely forgot that you even had it
- You purchased a teaching resource on TpT or elsewhere…and then didn’t have time to start using it
- You just couldn’t find that darn file or worksheet…where was it, again??
- You accidentally double-booked yourself or forgot you had an appointment after school
If you said YES! to any of those, then this blog post is for YOU! In this post, you’ll learn how to organize your “digital life” so that you can save time and stress — and spend less time planning!
Step #1: Get a free Google Drive or Dropbox account — and organize the heck out of it!
Nowadays, we use so many digital files and resources for teaching. Keeping those files organized is ESSENTIAL!
And I mean ALL your files…things you’ve created, TpT purchases, free PDFs…all of them.
If you don’t have everything in one place, you end up spending a few extra minutes searching for materials every time you plan.
Those extra minutes add up to hours. Hours you COULD be spending doing other things (like not lesson planning).
This is why I highly recommend keeping an organized Dropbox or Google Drive account where you store ALL your files.
Now, I know you can return to your TeachersPayTeachers account and re-download files anytime, which is convenient.
But this also means that you have to spend time searching for the file and redownloading.
Plus, if you’ve bought many items on TpT (like I have), you’ll have pages of purchases. This means that you might forget that you even have something!!
This is much less likely to happen if you maintain an organization system for your files. Then, when you’re looking to teach a certain topic, you simply go to the corresponding folder and look at what you already have.
So after you’re done reading this post, take 20 minutes — right now! — and set yourself up to save tons of time later on.
Get your free account set up (if you don’t have one already), and make folders for EVERYTHING!
For example, you might have folders and subfolders like this:
Folder for “Literacy”
- Subfolders for: Centers, Grammar, Guided Reading, Handwriting, Phonics, Phonological Awareness, Readalouds, Shared Reading / Reading Worksop, Vocabulary, Writing
Folder for “Math”
- Subfolders for: Number Sense, Geometry, Addition, Subtraction, Measurement, Time, Money
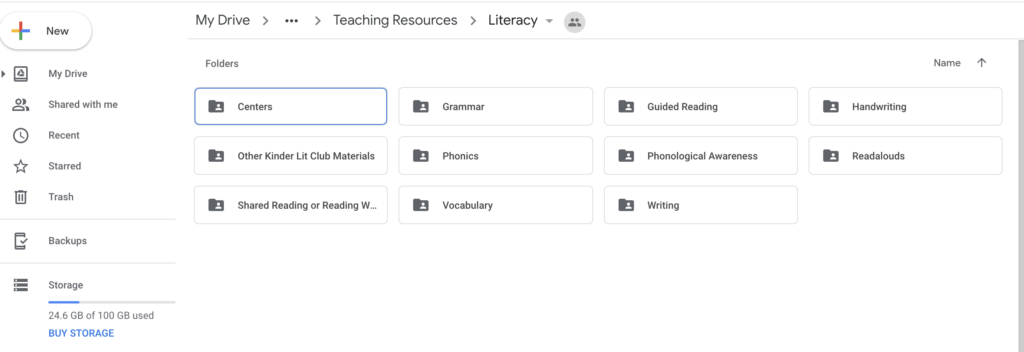
Of course, your subfolders will vary. But you get the picture! Create folders for science, social studies, and any other subjects you teach.
And then USE THEM! Every time you purchase a resource or download a freebie, upload it to the correct file.
If you find a helpful article while browsing Facebook, you can even upload a screenshot of it. Same thing goes for a helpful post on Instagram: screenshot it and add it to that folder!
You’ll be able to access your Google Drive or Dropbox account from your home computer, school computer, tablet, or phone so you won’t have to email yourself files anymore, either! YAY!
Once you have this all set up, you’ll feel so organized. And more importantly, you’ll save time and energy. You won’t spend so much time searching for materials!
Step 2: Create a no-fail system for processing emails.
We all get so many emails these days. If you’ve ever forgotten to respond to one, just know I’m right there with you!
Sometimes I’ll read an email and won’t have time to respond to it.
But if I’m not careful, that could mean that I never respond to it at all!
Fortunately, however, that doesn’t happen to me very often. But it’s because I have a very specific system for processing emails.
I follow these 2 simple “rules:”
- If I open an email, read it, and either respond / don’t need to do anything, I click “archive.” The message goes out of my inbox. It’s still saved in case I need to search for it later, but it no longer appears when I log into my email.
- If I open an email but can’t do anything about it in that moment (i.e. I need to ask someone a question before responding, need more time to think about my answer, etc.), I leave it in my inbox.
In a nutshell: when I’m done going through email, the only messages left in my inbox are those that I still need to respond to / do something with.
Archiving unneeded messages keeps my inbox sooo much neater! And it helps me ensure that I don’t accidentally forget to respond to a message because it gets buried by other messages.
Step 3: Use a digital calendar or to-do list with recurring tasks.
If you’re a paper planner lover, you might be thinking, “Whoa, whoa, whoa there, Alison. I just bought my 2020 planner! And it’s gorgeous!”
And I feel you! I used to be a “paper-only” kind of gal. I refused to go digital.
Until I realized that going digital made my life much easier. ?
Here’s why I now love using a digital calendar:
- I don’t have to worry about forgetting my planner or trying to bring it everywhere.
- I save tons of brainpower with recurring tasks and events. There are some things I need to do every Sunday: meal prep, laundry, etc. There are some things I need to do every Thursday for lesson planning: write plans, make copies, etc. I set these up ahead of time on my digital calendar. Then I don’t have to try to remember all the things I must do! (And I’m less likely to forget something.)
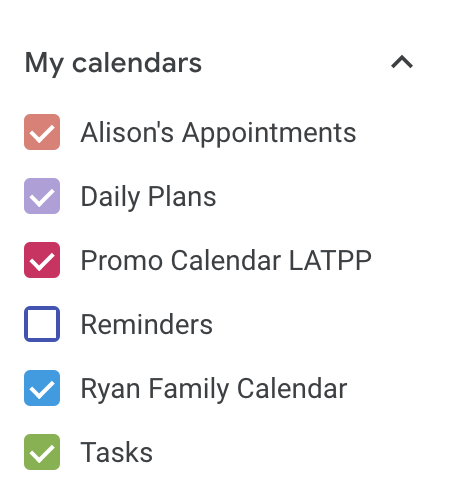
- In Google Calendar, I can have multiple calendars for the different “areas” of my life and share each calendar with different people. For instance, I have a school events calendar, a personal appointments calendar, a Learning At The Primary Pond calendar, and a Ryan family calendar. They ALL show up when I log in, so I don’t accidentally double-book myself! (Note: you don’t have to have so many different calendars. I do for practicality reasons, but you can stick to just one.)
- I can set reminders about events and appointments. These go to my phone half an hour before the event. So handy!!
There are many options out there for digital calendars. I like using Google Calendar. Every 3 months, I go through and set up my tasks for each Sunday and Thursday (and any other days of the week). When I have a recurring event (like a meeting), I can set that up in Google Calendar to automatically repeat.
Todoist is another option for a to-do list, and you can create tasks that recur too.
Time to Get Organized!
If you use these 3 tips, I promise that you’ll spend less time searching for files and feel more “on top of” your digital life! (Honestly, implementing even just one of these tips can make a big difference!)
Which tip(s) do you plan to try? Leave me a comment below! ?
I love sharing organization and other teaching tips for K-2. To get those tips and freebies via email, you can sign up HERE (you’ll even get a freebie to help you get started with organizing for literacy centers / D5).
Happy organizing!!


 Things To Leave For A Sub")


How do you find your archived emails?
Hey Robin, it depends on your email provider! With gmail, there’s a tab at the side for “all emails.” 🙂
Hey Alison! I so want to become a digital planner but I’m a paper planner nut. I have my 2020 Erin Condren and a bullet journal – and yes I get dates confused all of the time, the EC is HUGE, and using stickers and pretty things in it costs me a fortune. I can’t figure out why I can’t get myself on board to go digital. I have free apps on my phone too for gratitude, tasks, notes, and a calendar. Maybe one day I’ll convince myself. As for the article, great stuff. I think a common theme with… Read more »
Hey Amy! I totally responded to this already and it deleted my comment! 🙂 But anyway, I think I just said that I also love how planners look. I just couldn’t keep up with one and sometimes misplaced it, and the digital stuff helped SO much! Maybe you’d like scrapbooking or something like that instead of a planner!
I needed this ‘kick in the butt’ today. I have both Google Drive and a lengthy TpT purchases catalog that is a nightmare to find things in. I’m going to organize my TpT things in Google folders TODAY!
Thanks : )
Yay!! You got this!! 🙂
I really struggle with my g drive and being able to organize it. When I do a search it searches my whole school network instead of just my drive. Suggestions?
Hey Stacia! If you go to the search bar and hover over the right-hand side, there should be a little drop-down arrow. Click it and look at the more advanced search options. That should let you filter out where you want to search!
Alison
I love this idea. I had to think for a moment where I had seen the post about getting organized. Since we don’t have school right now due to COVID-19 this seems like a perfect time to start organizing all of my resources in Google Drive. My district provides us all with a Google Drive account. I even brought my laptop home so I don’t have any excuse not to do this!
Hey Kelley! Yes, perfect timing for that!!
Hi Alison! Thank you for these tips. I’m struggling with how to save resources I’ve made on Microsoft PPT or Word to my Google drive without changing the formatting completely. I can save them as a .pdf, but then I am not able to revise that document from year to year. There are a few outside programs that will convert the file back to it’s original formatting, but only for files that are no bigger than 10MB. Any suggestions? Thanks!
Hey Caroline! I’m not sure about doing that with Drive. What I do also love is Dropbox because you can revise them easily if you save them there!
Hi there- just found this blog post and read through it- honestly- which is better- a google drive or dropbox or are there particular reasons why one would use one over the other? Before I jump into one of these just thinking through the options. Thanks so much!
Hi, Laurie! That’s a great question! I do use both Google Drive and Dropbox-and they both have their pros and cons. I found this article (https://www.digitaltrends.com/computing/google-drive-vs-dropbox/) that compares both online storage spaces. Hopefully this is able to help you make a decision about which one to go with. 🙂