Oh, technology. Whether we love it or hate it, it’s here to stay!
And as I’m writing this post (in the time of the pandemic and remote learning), we’re relying on technology more than ever before! Sometimes navigating through all of the technology tools can be a bit overwhelming…am I right?! ?
In this post, I’ve got some tech tips and tricks to make your digital teaching life easier!

Tip #1: Converting Documents to a PDF
Have you ever tried sharing a file with a friend or colleague – but then the formatting was all wonky?
That happens sometimes. It’s simply due to people using different devices, different fonts, different versions of software, etc.
But there’s a way around this! You can convert the document to a PDF in a snap.
When you save a document as a PDF it “freezes” the formatting and layout. This is SO useful when sharing documents that don’t require editing.
Here’s how to do this:
- At the top left of the screen click File–>Save As
- Next to File Format, use the drop down arrows to select PDF
- Click “save”
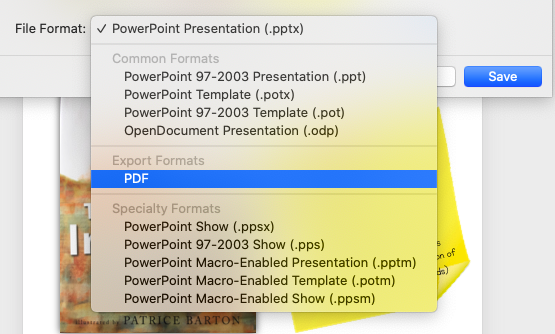
Now your document will be accessible as a PDF – and the formatting will be just as it was on your computer. Yay!
Tip #2: Viewing Multiple PDF Pages
Imagine that you just downloaded the Writing Workshop Curriculum Bundle and you’re so excited to view the different resource pages! When you open the first unit of the PDF document, you’re only able to view one page at a time.
If only there was a way to see multiple pages to quickly navigate within the document ? …Oh wait, there is!
To view multiple pages within your PDF document, follow these steps:
- Click on the icon of two (layered) pages, on the left-hand side
- To enlarge or reduce the thumbnails, click on the icon that looks like a rectangle with bullet points inside
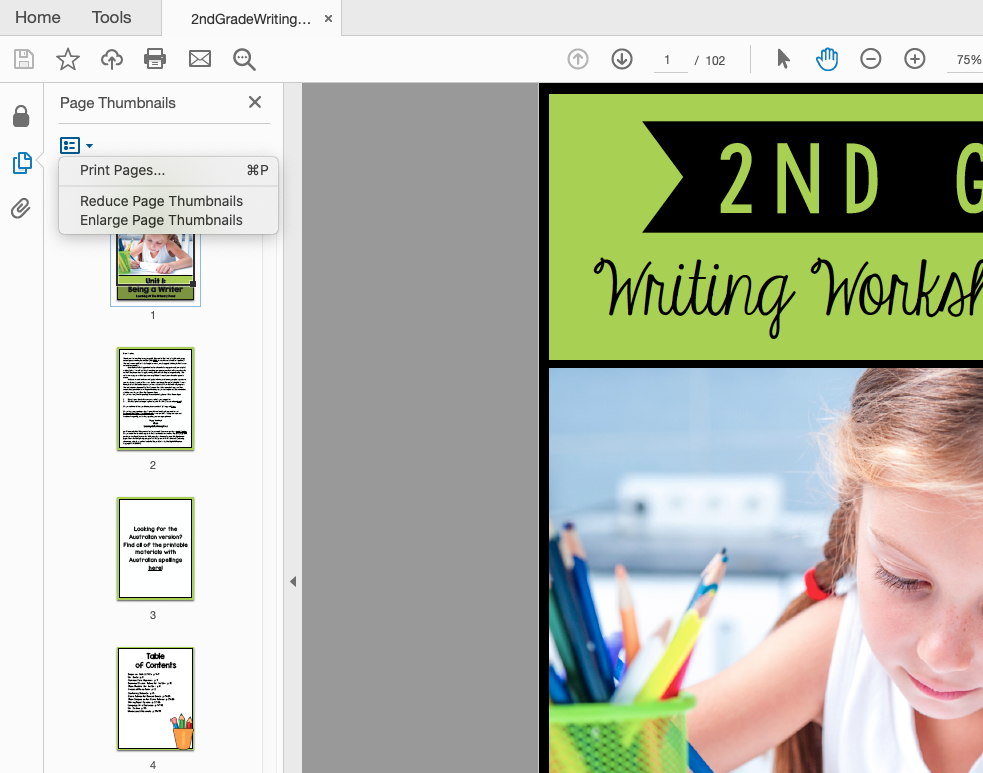
This makes it so much easier to find the pages that you need!
Tip #3: Printing PDF Pages
So now you’re feeling like a “PDF Pro!” You can easily scan through the multiple pages in your PDF document.
But..now you want to print multiple pages. Don’t waste time printing one page at a time or writing down page numbers, instead use this little trick to print multiple pages at once!
- While viewing multiple pages (see Tip #2), hold down the “CTRL” or “Command” (MAC users) button and click on the pages you want to print
- Make sure to hold down the “CTRL” or “Command” button before clicking the next page that you want to print
- Click on the printer icon or CTRL + P (Command + P for MAC users) to print your selected pages
Tip #4: Printing a PDF as a Poster
If you’ve ever wanted to turn a particular PDF page into a larger poster, then this next tip is for you!
This tip will show you how to take any page within a PDF document and print it as a larger poster.
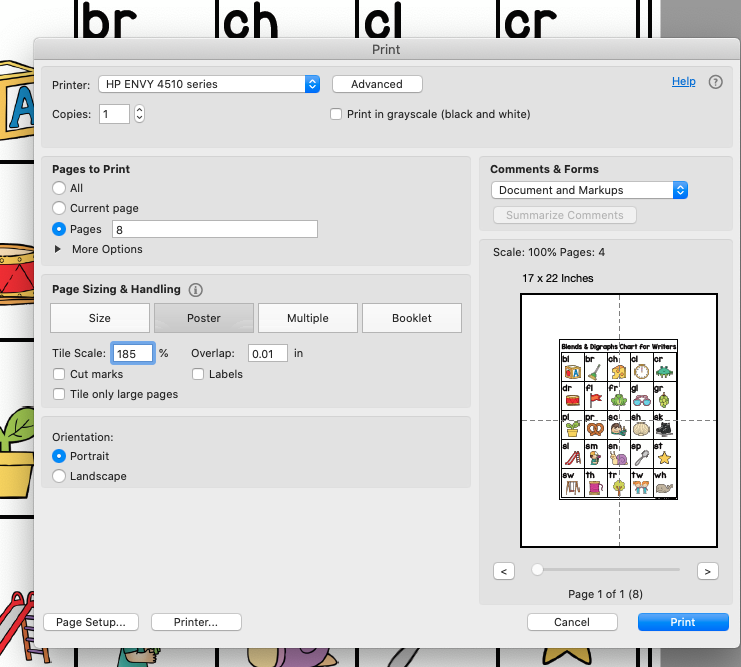
- Open your PDF and select Print
- Click Poster under the Page Sizing and Handling section
- Change the Tile Scale to 185% and the Overlap to 0.01 (This will print a poster on four sheets of computer paper.)
- You will need to trim the edges, ensuring to leave overlapping, so that you’re able to either glue or tape the poster together
Tip #5: Making PDFs editable in Google Slides
Whether teaching in person, remotely, or with a hybrid model, you may be looking for ways to assign your students independent activities/assignments digitally.
For example, you may want to assign your students a Reading Response sheet or a Writing Response activity for them to complete independently.
This next tip will show you how to transfer any PDF page into a digital activity within Google Slides!
- First you’ll need to take a screenshot of each page that you want to transfer to Google Slides:
- For Windows users, use the snipping tool-you can use the search bar to find this tool
- For MAC users, you can use this keyboard shortcut: command + shift + 4
- Save the image to your computer (I find that saving it directly to the desktop is easiest!)
- Access Google Slides and create a blank presentation
- You will need to change the size of the slides by clicking File–> Page Setup–> Custom–> change page settings to 8.5 x 11
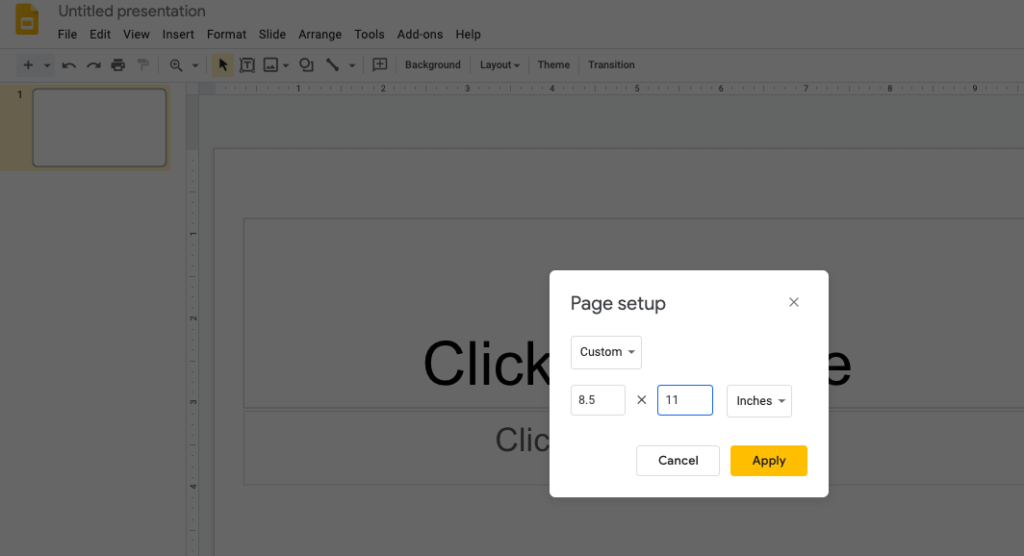
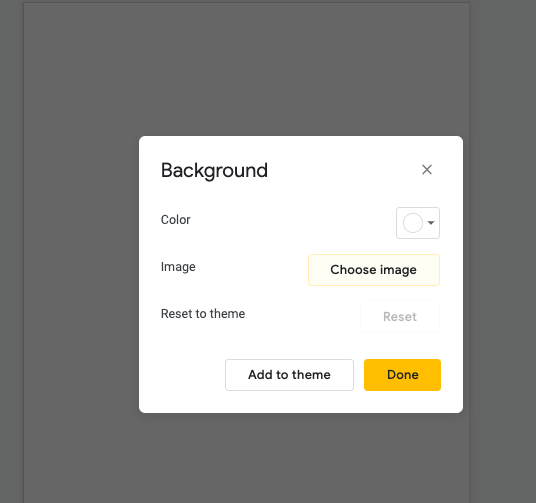
- Go back into the presentation and right click–> Click Change background–> Choose image–> Select image to upload
- The image then becomes the slide background and students won’t be able to move the image around!
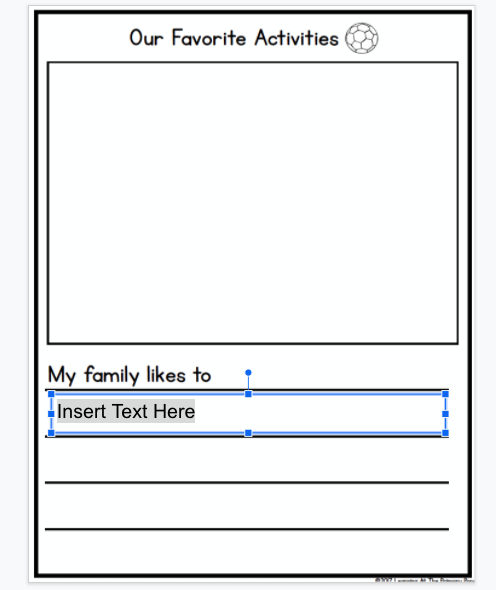
- You can insert text boxes where you want students to type. You can then use the keyboard shortcuts CTRL (Command) + C and CTRL (Command) + V to quickly copy and paste additional text boxes
Tip #6: Using a Split Screen
Sooo many things on the computer require going back and forth between two windows, programs, or tabs.
Some people have two monitors. But some people (like me!) only use one.
If you want to be able to view and work on two programs at the same time without using a second monitor, you will love this next tip! You’ll learn how to create a split screen on your computer so you won’t have to toggle between multiple programs at one time!
MAC Users
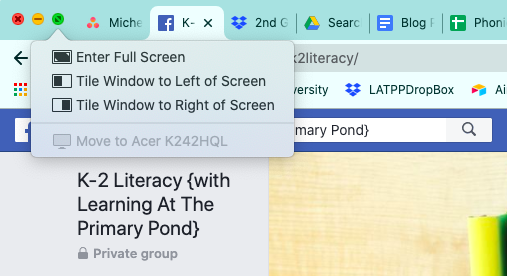
- Click on the GREEN minimize button in the upper left hand corner of your web browser
- Once the screen is minimized, click and hold the cursor on the GREEN minimize button
- You will have the option to tile the window to the left or right of your screen
Follow the same steps for other programs that you are using and you will be able to view both screens at once!
Windows Users
Hold down the Windows button and either the left or right arrow key (depending on which side of the screen you want it to appear)
The window that you are in does not need to be minimized for this to work! ?
Tip #7: Embedding a Timer into Presentation Tools
We all the know the importance of sticking to a rigid schedule to be able to fit in all the things! In the past I’ve used a manual timer or my phone to keep track of time. That worked great for me.
But for the students? Not so much.
If your kiddos are often asking, “How much time is left?” or “Is it time for lunch?”…
then you’ll love this embedded timer trick!?? ⏲
Google Slides
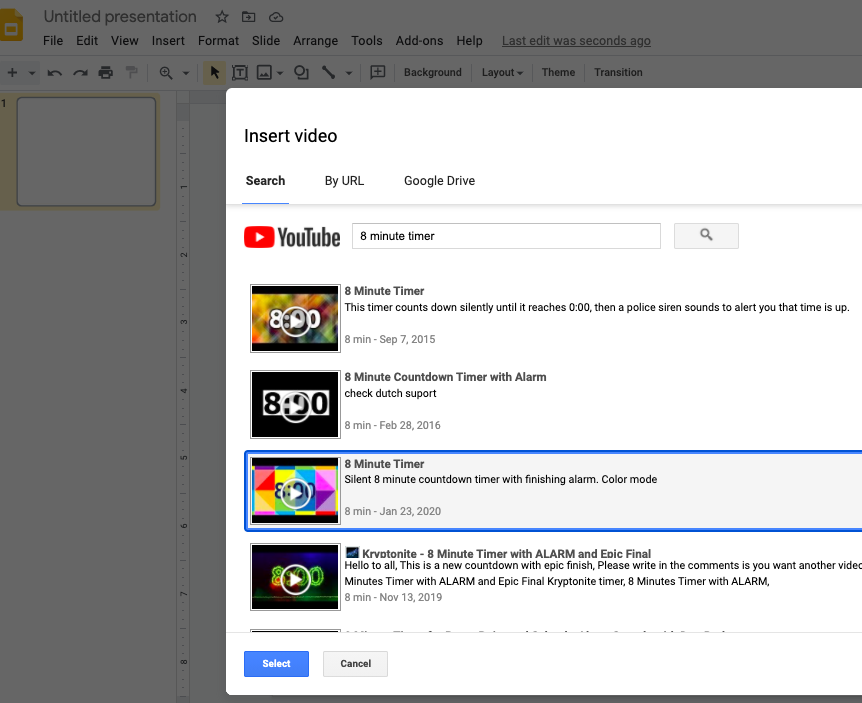
- Open a new Google Slides presentation and click insert–> video
- Then, search for a timer video via YouTube
- When you’ve found your video, click select —-> resize image size as necessary
*It’s important to note that the video will only play when in “Present” mode.
Microsoft PowerPoint
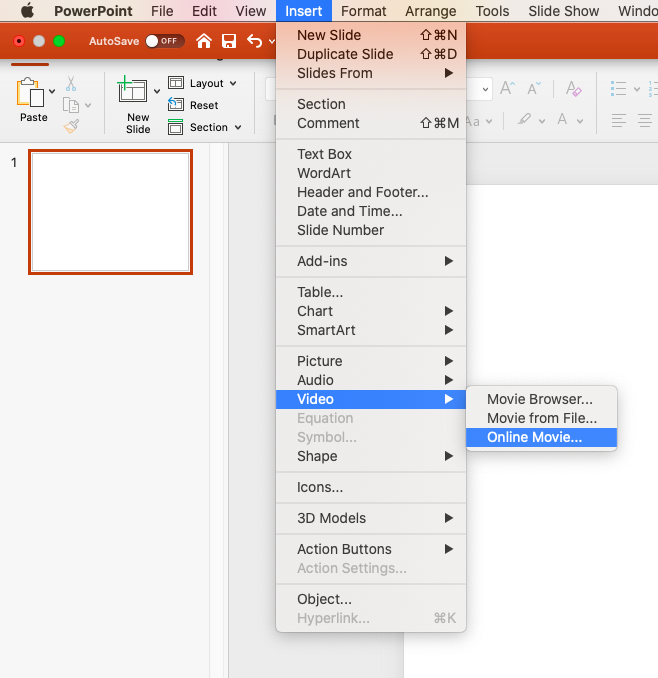
- Open a new PowerPoint presentation and click insert–> video–> Online Movie
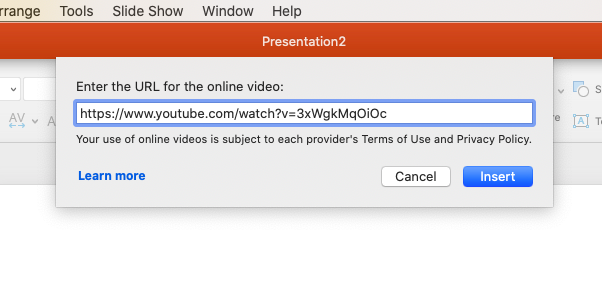
- You will need to copy and paste the URL for the video that you want to insert–> then click Insert
- You can resize your image as necessary–will only play in presentation mode when you click play
Your Ideas?
Do you have any time-saving tech tips or tricks that help you teach and plan? I’d love to hear them in the comments!
Happy teaching!







This is so great! However, I am so overwhelmed that I don’t even understand the first thing about using the items I have paid for. Does anyone ever do one on one consultations?
Hey there Meghan! I’m so glad that you found the tips useful! If you let me know which items you are wanting help with/wanting to know more about I would be more than happy to help you! 🙂
Thank you sharing. I love how you showed how to view your files as you made them. I have run into this problem and glad you shared how I can fix it.
I
You’re so welcome, Julie! I’m so glad that you found that helpful! 🙂
Very useful information!
Thank you, Delrose! I’m glad that you found these tips useful! 🙂
Great tips! Thank you!
You’re so welcome Christiane! 🙂
Wow! Lots of info. Thanks!
You’re welcome, Leslie! 🙂
Thanks so much! I hate computers and am having to use them to do lots of new things. I need all the help I can get!
You’re welcome, Debbie! I’m so glad that these tips were helpful to you! 🙂
Thank you! This was so useful!
You’re welcome, Sara! I’m glad that you found these tips helpful! 🙂