Another name for how-to writing is “procedural nonfiction.” It’s all around us, and we may not even know that! Even as adults, we come across how-to writing all the time! Sometimes it’s step-by-step guides, like “How to Assemble XYZ Piece of Furniture.” Or it could be directions for a new game given as a gift. How-to books, in its simplest terms, teach the reader how to do something.
In theory, how-to writing should be one of the easiest things for students to do! You’re literally asking them to tell you about something they already know how to do. Why, then, can it seem challenging to get K-1 students to successfully write a how-to book?
Without guidance for writing how-to books, students might do the following:
- pick topics that are too general (i.e. “How to Play Sports”)
- attempt to write about a new skill they lack experience in (i.e. “How to Drive a Car”)
- leave out major steps in their writing pieces (i.e. forgetting the step about turning the oven on in “How to Make Cookies”)
In many genres, whether it’s how-to writing or creative writing, the hardest part can often be getting students to write with the level of detail you’d like. They may come up with something very short and then just say “I’m done!” In this post, I provide 10 tips on how to get your Kindergarten and 1st grade students to successfully execute the how-to writing process, all the way from planning to adding in details!
Tip #1: First introduce the topic of how-to without the students even knowing!
This may seem obvious, but before you have students actually write their own pieces, find ways to get them excited about the topic. A good way to do this is to have the kids work together. An example would be having them work together to help you make a recipe. So this could be fruit salad. It could be trail mix. Obviously, be aware of food allergies and what is allowed at your school. If you can’t do food, try how to make a craft or a paper plane instead.
For this example, let’s use the task of making a snack for the class. I actually like to kick off my how-to writing units with this type of lesson on making trail mix. Together as a class, we make trail mix. I don’t explicitly say “Today we’re going to learn about a type of writing called ‘how-to.'” For this first lesson, students don’t even really know why we’re making trail mix. But the buy-in is big because they have so much fun!
After that first lesson, usually the next day, I come back and ask them “What would we do if we wanted to teach a friend, someone in another class, or someone in your home how to make trail mix?”
- What would you say?
- What did we do first?
- What did we do next?
Because they had a meaningful experience of making the trail mix, they were able to verbally talk through how we did it. They start by just retelling me the steps. The recall and retelling is easier because they were a part of that initial process.
Tip #2: Turn their recollection into writing. Then, name the topic of “how-to.”
After they’ve talked through it, I show them on paper how to take those steps and turn it into writing. Then, at the end, I tell them “We could give this to someone else and they would know how to make trail mix! What we just did right here is called how-to writing. We’re teaching our reader how to do something.” This is easier to model the process because it’s taking something they (now!) know how to do, and turning it into writing.
Tip #3: Utilize mentor texts for guidance.
It can help to use mentor texts so that students have real examples of how-to books. These can range from a picture book to a more advanced non-fiction book. Here are a few options for a good book showing how-to writing:
- “How to Make Slime” by Lori Shores
- “How A Book Is Made” by Aliki
- “The Pumpkin Book” by Gail Gibbons
- “How to Make Salsa” by Jamie Lucero
- “Make a Valentine” by Dale Gordon
- “How to Make a Hot Dog” by Joy Crowley
- “How a House Is Built” by Gail Gibbons
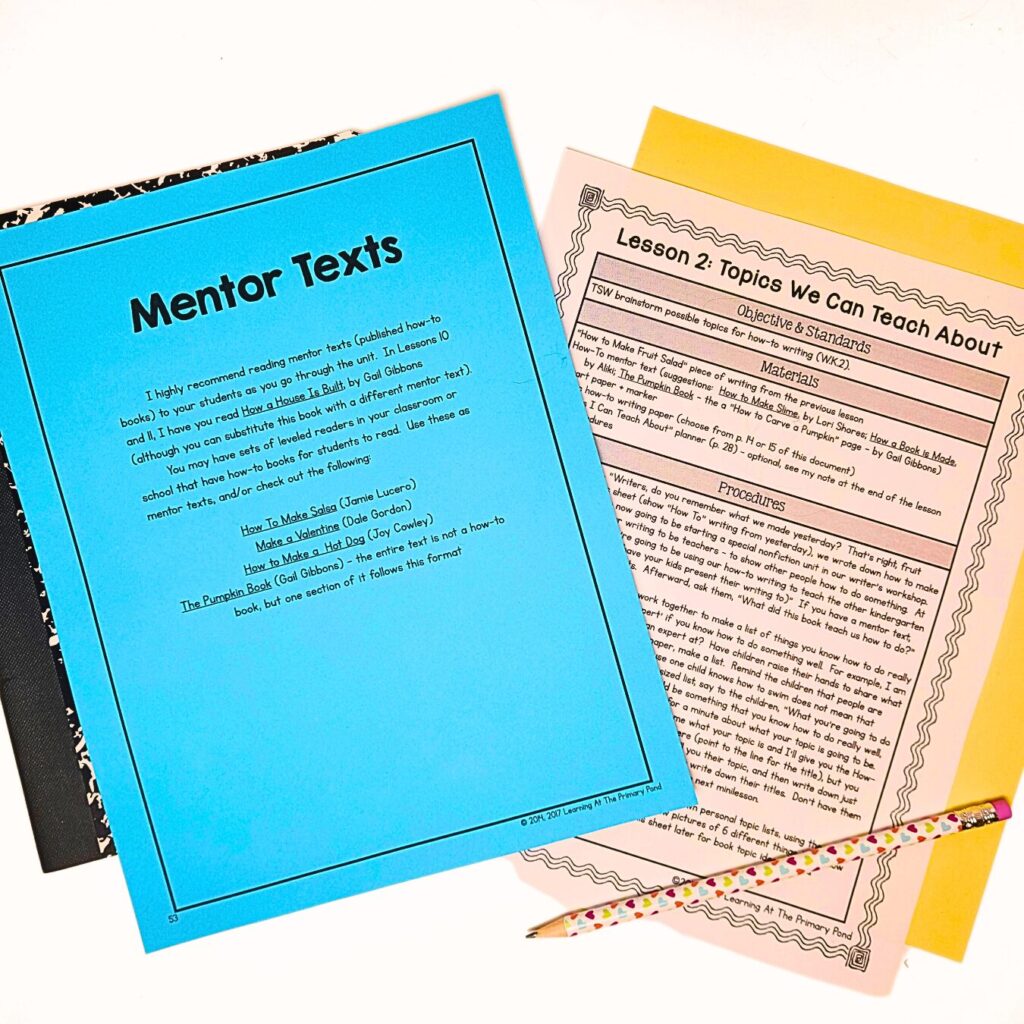
Quite often, you don’t have to read the entire book. For instance, only one specific page in “The Pumpkin Book” called “How to Carve A Pumpkin” is most applicable. More detailed book lists and additional explanations on how to use mentor texts are included in my how-to writing units!
Tip #4: Have students brainstorm ideas first.
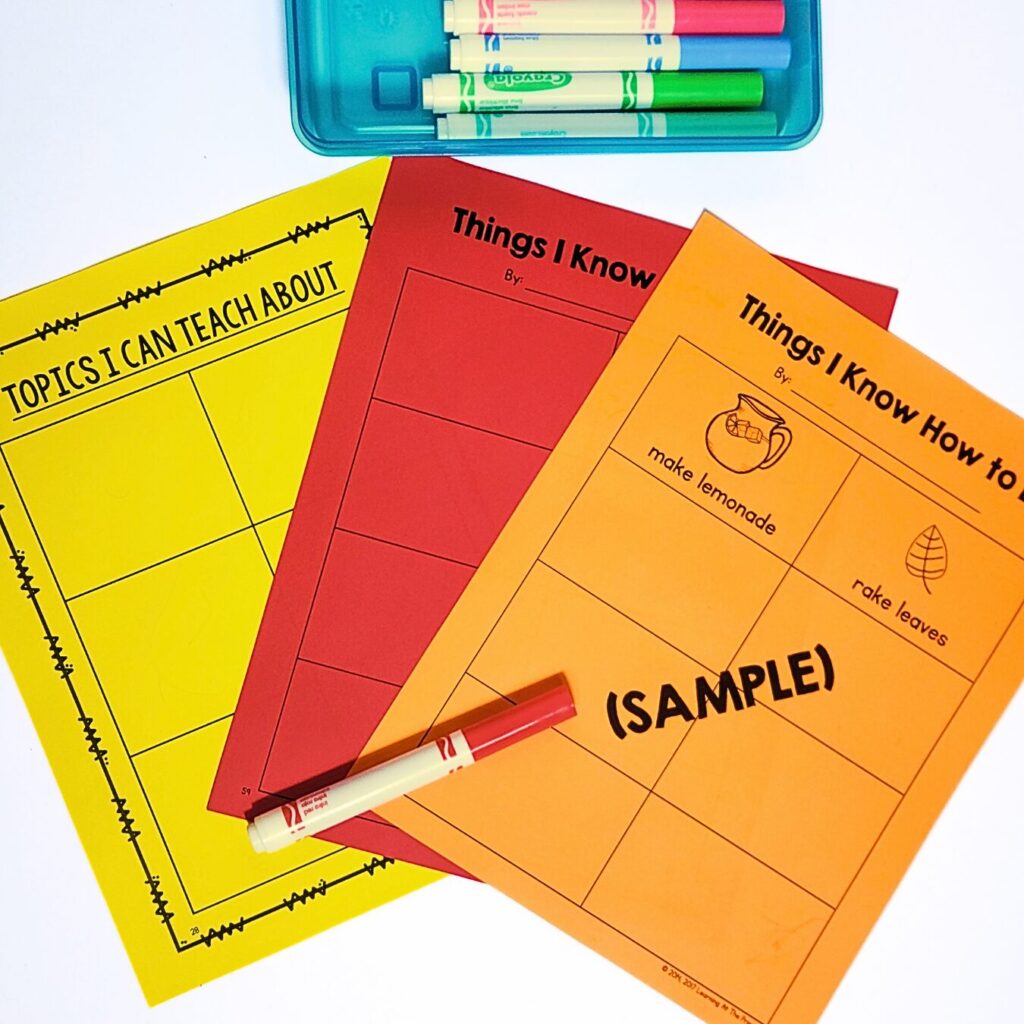
These are brainstorming sheets included in my Kindergarten and 1st grade how-to writing units. First, I will help them brainstorm as a class – “What are some things we are experts at?” These would be things that all of the kids know how to do (i.e. brush your teeth). This doesn’t necessarily have to be a written list. Especially in Kindergarten, they can draw little pictures of things they know how to do.
We also talk about how one student may know how to do something that somebody else in the class doesn’t know how to do, and that’s okay! For example, maybe there’s a student in the class who can play the piano. But you shouldn’t add something to your own sheet that you don’t know how to do. So we talk a little bit about individual differences in that sense.
Sometimes kids will choose very general topics like “How to Play Soccer.” That’s pretty broad and could probably take an entire manual to explain. You can help them focus in a little bit. Instead of “How to Play Soccer,” it could be “How to Do a Corner Kick.” That’s something more focused.
Students then keep this sheet in their folders throughout the entire how-to writing unit. The purpose is twofold:
- This brainstorming sheet shows the kids that they have a lot of stuff to write about.
- When they finish one how-to book, I don’t want them sitting there and saying “I’m done!” Instead, I want them to come back to this list, choose another topic, and then keep going. Especially in Kindergarten and 1st grade, students will write more than one how-to piece during the unit. So this brainstorming sheet helps with that.
Tip #5: Start with visualizing and a verbal explanation.
When they’re ready to take one of these ideas and actually write about it, I’ve found that the best way to get students going is to have them think about it and then say the steps aloud. First, I model how to visualize. Using the “How to Do a Corner Kick” example, I’d say:
“I’m imagining how I would walk over to the corner of the field. Then I’d put the ball on the little corner spot. Next, I’d look up at the field, and I’d look to see which one of my teammates is open. I’d choose somebody to kick it too. Then, I’d take a couple of steps backward from the ball. The ref has to blow the whistle, and then I can run toward the ball. I kick it to whichever teammate I chose!”
After I’ve modeled this, I have them visualize their own topic. They imagine step by step what they are doing. Then, have them talk it through with a partner. Sometimes when we’re explaining something, even as adults, another person can help identify gaps/holes in our directions. That partner can ask questions to help clarify and add more details as well.
Tip #6: Plan out the steps, and use differentiated resources when needed.
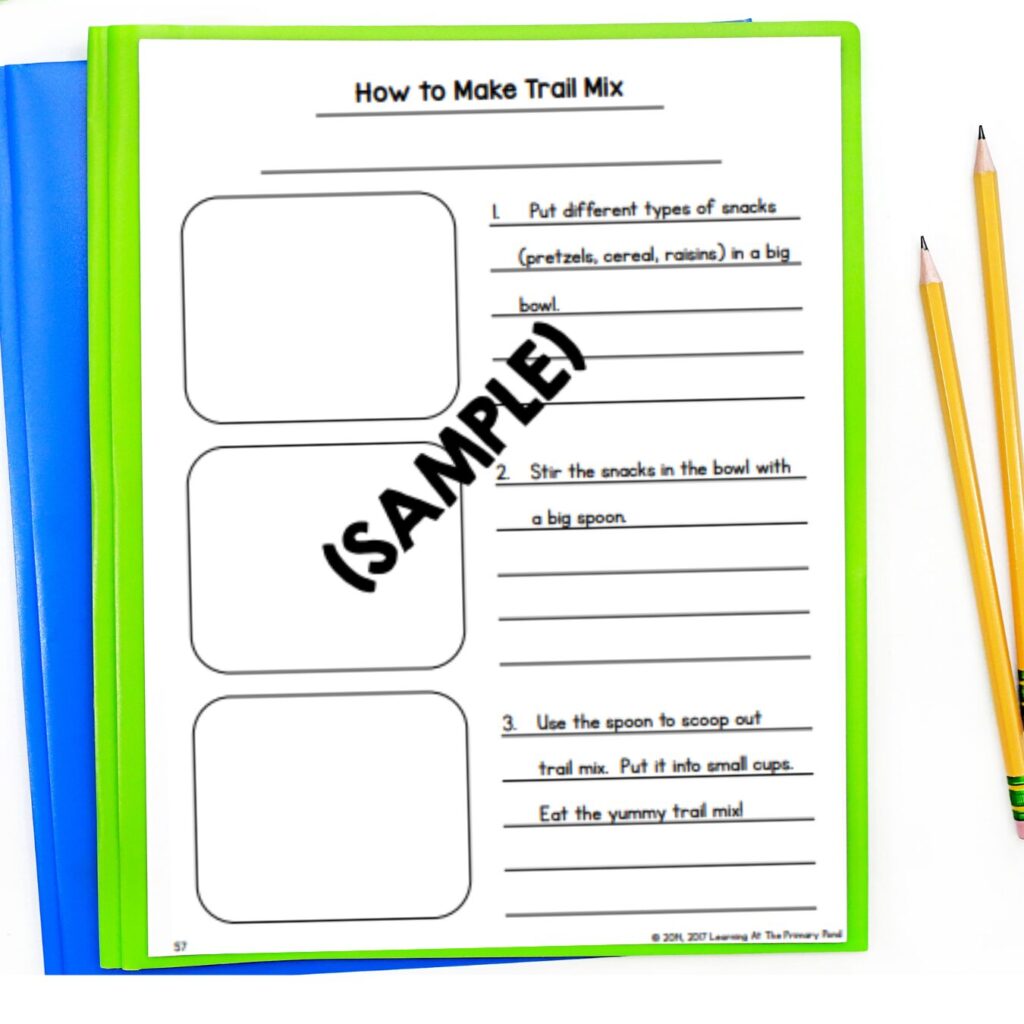
Once students have verbally said their steps, it’s time to put their pencil to paper! Often it can be helpful, especially for K-1, to have them start with drawing. These organizers come in a few different options that are differentiated.
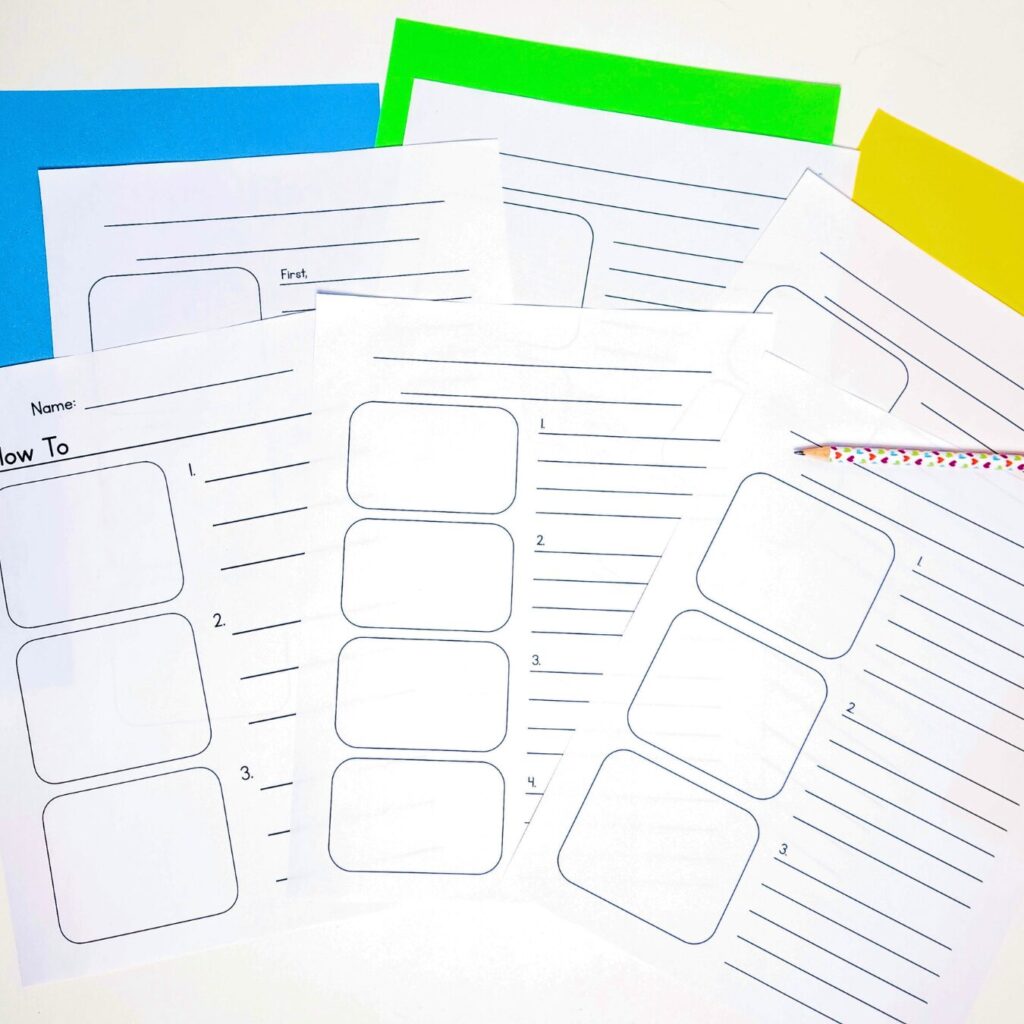
Some organizers have words, numbers, and additional boxes.
It can be easy for students to get lost or confused in the writing process. So if students get stuck or need support, have them go back to verbally stating the directions. Then they can see what they may have left out of the written directions or what is still unclear.
Tip #7: Transfer the steps to a book format.
The eventual goal in my how-to writing units is to have students transfer the steps from the organizer into an actual how-to book. Each step becomes its own page. (Side note: If you’re working with older kids who are actually writing paragraphs, it doesn’t have to be a book. It could be step one is paragraph one, step two is paragraph two, etc.)
This again is something you’d want to stop and model for them:
“Writers, I’ve noticed that some of you are running out of space on your how-to writing planning pages. You are writing so many words and details, but there just aren’t enough lines. For that reason, today we are going to start writing our how-to pieces in books with 3 pages. Let’s take a look at the how-to piece we wrote about_____. You’ll see here that the first step has the number one in front of it. That tells you that in the process of _____, the first thing we do is ______. You would write that step on page one of your book.”
Then you’d repeat that process with the next couple of pages.
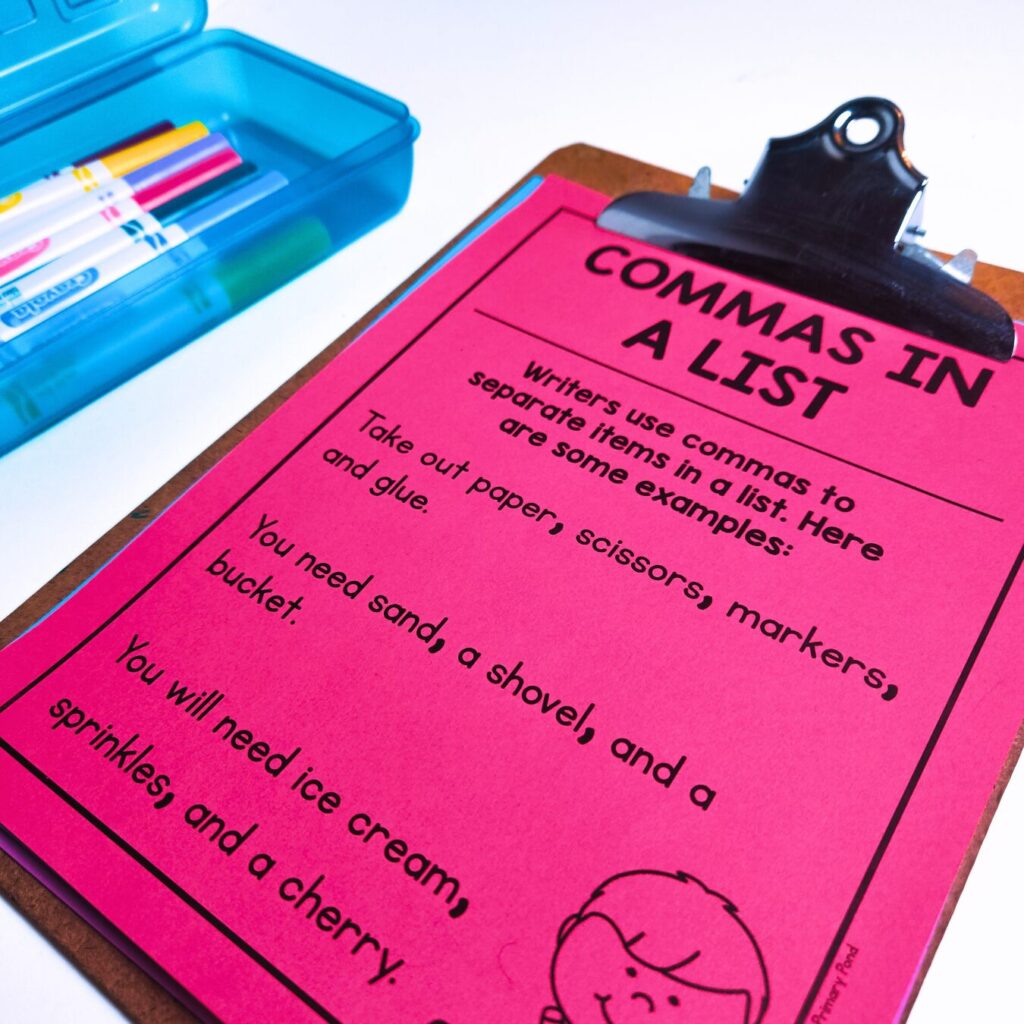
Tip #8: Have students add in the necessary materials/supplies.
A recipe always begins by listing out the ingredients you’ll need. A manual starts off by naming what tools/pieces you’ll need. Considering this, you’ll want to have students go back and list out the necessary materials.
“Writers, yesterday you started writing how-to books by using words and pictures. Today I’m going to show you something important that you will want to add to the beginning of your how-to writing – a list of materials or supplies that the person will need in order to do your activity.”
This is also a good time to teach first grade students about commas. Students can refer back to this chart as a reminder of when and how to use commas.
Tip #9: Teach students how to use transition words.
Usually when students are verbally explaining the steps, they’ll naturally include transition words. “First, you ____. Then after that, you ____. At the end, you _____.” So how-to books are a great way to teach students how to write transition words!
As with anything in the writing process, first model this skill for them. Then provide time for them to help you think of some transition words (using these posters pictured below) to add to your writing. Last, allow them to go back into their own writing to add in some transition words.
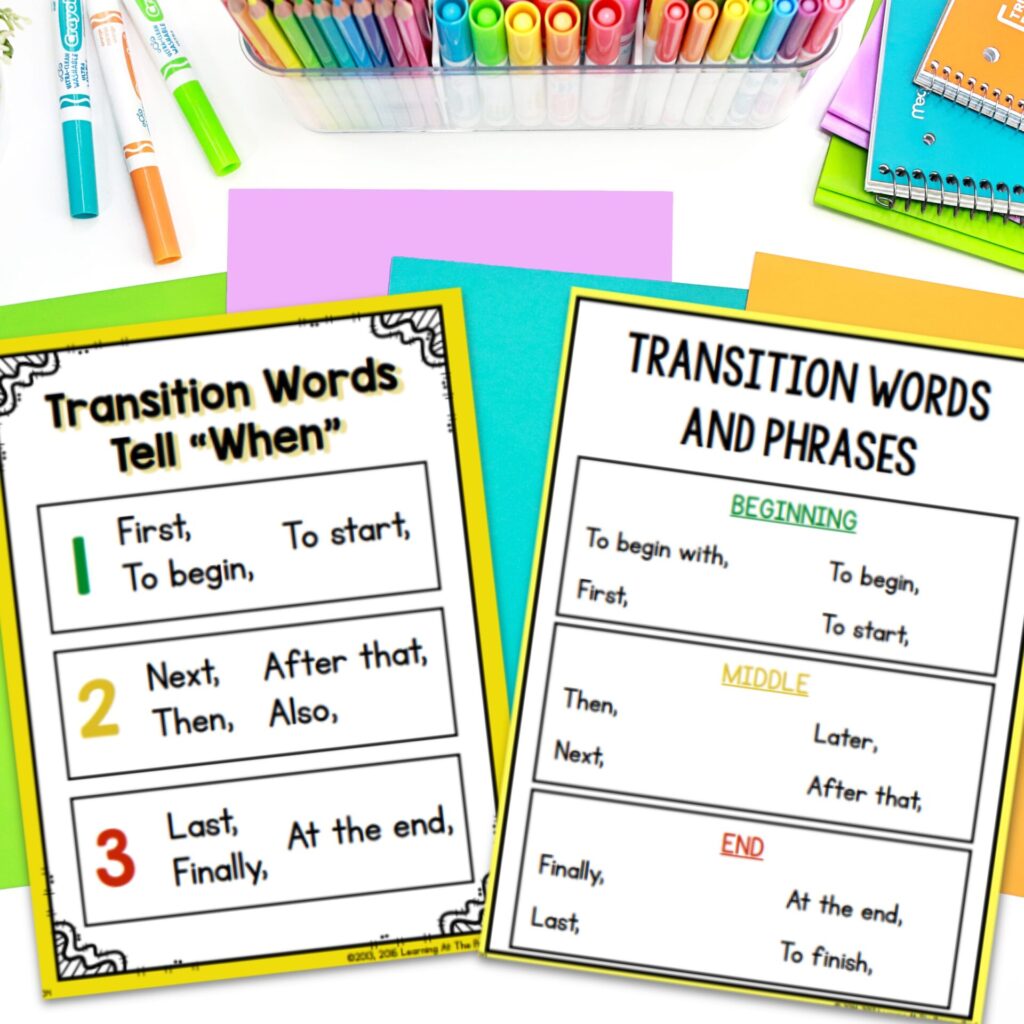
In Kindergarten and first grade, don’t worry about how many transition words your students use; rather, just help them begin to understand that they can use words to tell the order of steps in their how-to books.
Tip #10: Provide students time for reflection and feedback.
With any piece of writing, it’s important that students reflect and improve their writing as much as they can! These rubrics included in my how-to writing units really help students to have time and support in doing that.
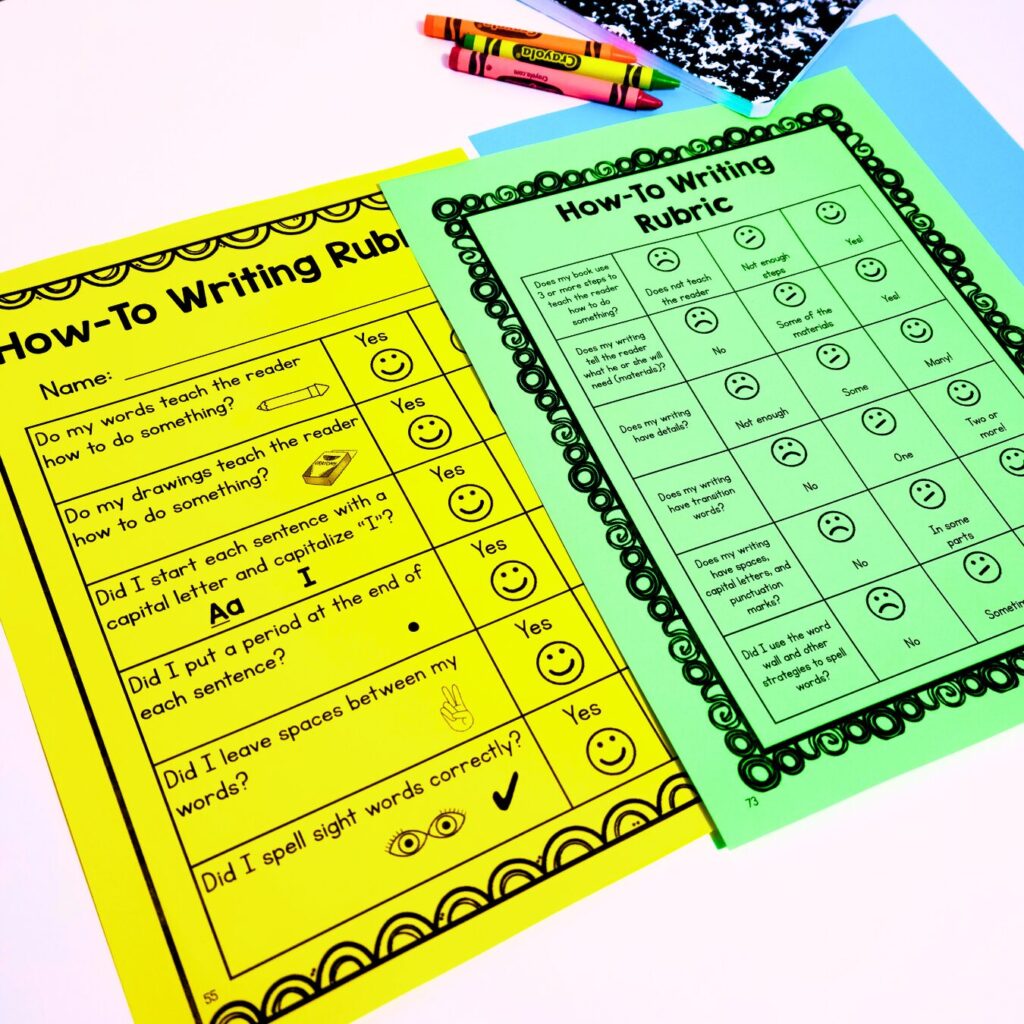
With this resource, I’d say:
“Writers, you have been working hard on your how-to books! I know you want your books to be the best that they can be. I’m going to have you partner up, read your work aloud to another writer, talk about it, and write down any changes on sticky notes.”
“With how-to writing, there are certain things that you will want to look for when you listen to a partner share his or her work at the table. I’m going to show you a rubric. Remember that a rubric is a tool writers use to rate their writing, to make sure it is the very best that it can be.”
Then, project it so students can see it clearly. Go over the rubric together before releasing them to work with a partner.
Conclusion
I hope these ideas on teaching Kindergarten and first grade students to successfully write how-to pieces are helpful to you! To have everything you need at your fingertips for teaching how-to writing in Kindergarten and 1st grade, check out my writing units!
Included in these how-to units are:
- lesson plans
- printable writing paper
- posters
- graphic organizers for planning
- writing rubrics
Happy teaching!