Writing and reviewing letters, sounds, and words is critical for young learners’ literacy journeys. It can get monotonous. But what if there was a way to make it more engaging and effective? Enter multi-sensory writing! This approach incorporates multiple senses to solidify students’ phonics learning.
Multi-sensory instruction of all kinds can be engaging and effective for ALL students. (For more information on the pillars of an effective phonics program, check out this blog – 5 Things to Look For When Choosing A Phonics Program.)
Multi-sensory writing, in its simplest terms, requires students to use more than one sense. It can incorporate sensory materials, but it can also be as simple as having students trace a letter in the air and say its sound at the same time!
In this blog, we’ll explore how to create sensory materials for multi-sensory writing to elevate your phonics and handwriting instruction.
Sensory Materials
Multi-sensory writing is part of our phonics program, From Sounds to Spelling. The program comes with many training videos to support teachers with implementation, including a video called “Creating Sensory Materials for Multi-Sensory Writing.” To watch the video, you’ll need to have purchased a license to From Sounds to Spelling – but I’m going to share a few highlights in this post.
Knitting Screen
One of my favorite options for sensory materials is having students write a letter/letters over a knitting screen (Amazon affiliate link). Students take a piece of paper and put it on top of the knitting screen. Then, with a crayon, they write on the paper. Let’s say students write “b,” for example. Because it was written with the knitting screen below the paper, the letter “b” now feels raised up and bumpy. With this option, students can also keep the papers in a folder. They can go back and practice tracing over the bumpy letters again and again.
As students trace the letter, they verbalize the name and/or sound. This could sound like: “B says /b/” or “B can say /b/” or “B can spell /b/.” However, when students are first learning to form the letter correctly, they should just focus on tracing it correctly. You can add the verbalization later.
Sand
Another great option for multi-sensory writing is to use sand. Colored sand is an added bonus! You could have the sand on a plate or in a small box.

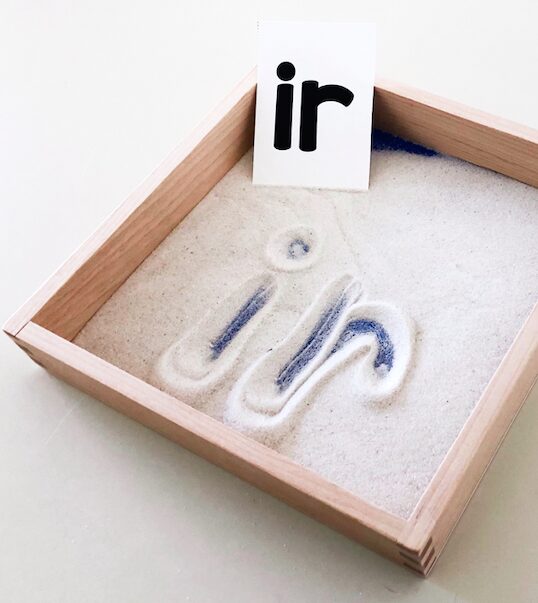
Plates are a really easy option for storage too because you can just collect and stack them.
Hair Gel
For this sensory material, I recommend using (sturdy!) plastic bags. It’s best if you can find a bag without a label (so it’s completely see-thru). Put some gel in the bag and add a few drops of food coloring. For a bit more flair, you could add glitter. You can mix up the bags – different colors, some with glitter, etc.
Students then put the bag on top of a table or their desk, and trace the letter while saying the sound. For example: “S says /s/.”
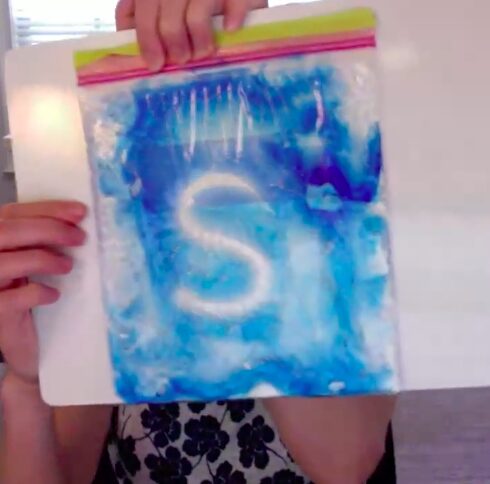
Then, students wipe it away by smoothing out the bag and do it again! Pro tip: I always put extra tape at the top of the bag juuuust in case the bag isn’t all the way closed or a student gets curious and tries to open the bag. 🙂
Shaving Cream
Shaving cream is usually a crowd favorite when it comes to sensory materials for K-2 students! For this option, you can either spray some shaving cream in a tray or even directly on students’ desks/tables. Students follow the same procedures as above – tracing a letter(s) and then saying the sound. “M says /m/.” Then, they wipe it clean to repeat the process for a different letter(s). A bonus for this option is the shaving cream helps to clean the surface!
Things to Consider
First, consider your own personality as well as the personalities of your students when deciding which sensory materials to use in your classroom. I personally prefer more low-prep, low-mess options. Also, some options are more cost-effective than others. Especially if you don’t have a budget from your school to purchase materials, you’ll want to keep the cost in mind. (Colored sand on paper plates is a great low-cost option).
You’ll also want to consider time. For example, if your gel bags are all ready to go, you can quickly pass them out and collect them. Other options, such as shaving cream, take a bit more time to prepare and clean up. This could get tricky considering the pace of the phonics program you’re using. This is not to say that you should never use shaving cream – but perhaps save it for special occasions.
I highly recommend introducing only one sensory material at a time. For instance, for a few weeks (or even months), have students trace phonics patterns in sand. After that, you can put away the sand, and move on to gel in a bag. It could be overwhelming, for both you and students, to have multiple options at one time, or even to switch back and forth frequently. Remember, you want this to be a tool for students, not a distraction, so narrowing their focus helps.
Also, just like how you’d introduce a new academic skill – with modeling, guided practice, and independent practice – sensory materials should be introduced in the same way. If I’m going to introduce a knitting screen, let’s say – here’s a process I follow:
- I briefly introduce the sensory material, show students the knitting screen, and model some ways you can use it.
- I then give students some FREE time to explore the sensory material. In this case, they could use the knitting screen to write or draw what they’d like. Maybe they want to draw designs or play tic tac toe with a friend. I give them this free play time because if I don’t, they might end up using instructional time later to play around. Instead, I just proactively provide them a short period of time to explore the new sensory material.
- Then, I explicitly tell students what we’ll be using the sensory material for moving forward. “When we use our knitting screen during phonics time, we’ll be writing the new letters we’re learning about.”
- Provide a model to students for writing a sound. “Watch as I write the letters ‘sh’ on the knitting screen. ‘Sh’ can make the sound /sh./”
- Give them time to practice the same pattern on their knitting screen, providing feedback if/when necessary.
Conclusion
By incorporating these multi-sensory materials, you can transform writing from a chore into an enjoyable experience for your students. Tailor the activities to your students’ ages/interests and experiment with different sensory materials!
Remember that a video on this very topic -“Creating Sensory Materials for Multi-Sensory Writing” is included in From Sounds to Spelling. There are also tons of other videos! You’ll have access to videos that:
- provide important details on each unit
- model hand movements for skills like segmenting words, spelling high frequency words, etc.
- give step-by-step directions on how to lead a blending drill
- offer ideas on how to organize and schedule your phonics instruction
The list goes on, and on! There are many videos at your disposal to watch ahead of time AND refer back to throughout the year. Having this type of professional development in a phonics program will not only support you but also help to keep your students engaged as you learn new tips!
Happy teaching!