
Yay for a brand new iPad cart with 30 iPads for my Kindergarteners!!

Having iPads in Kindergarten is awesome, but it definitely requires some careful setup. One of the first things I did when I found out my kids would be 1:1 with the iPads was to create a list of apps I was interested in. This took quite a while – reading tech blogs, experimenting with different search terms in the App store, downloading the free apps to see what they were useful for, etc. I used a spreadsheet to keep track of each app’s name, price, subject area, purpose, and when during the school year it might be used.
I also quickly realized (after unsuccessfully attempting to use my finger to take notes during my own graduate class), that if the kids wanted to do any serious writing or drawing on the iPad, they would need styluses. I ordered these over the summer so they would be ready to go for the school year (grab this inexpensive set on Amazon by clicking here):


Also, since most apps have sound, my grade level team put earbuds on our supply lists. Dealing with headphone storage and tangled cords can be such a nightmare, so I knew I wanted to start the year with a plan of action to avoid this. The kids will each store their headphones in a small Gladware container, and the container will hopefully go in their kangaroo pouches behind their chairs. I also want to try to keep most of the cord lengths of the earbuds tied up – most of that length just isn’t necessary for the kids, and I hope to prevent tangling this way.

Once I’d taken care of these “extras,” it was time to set up the actual iPads. My district numbered the iPads, and the inside of the cart also has numbers to match the iPads to. At first I thought about not assigning the kids to use a specific iPad or charging slot. Then I realized that they might want to access pictures they had previously taken, drawings they had created, etc. And if they didn’t place the iPad in a consistent spot, they would never be able to find it the following day.
Here’s how I assigned iPads to children:
1. Typed up an assignment list to post by the iPad cart (i.e. iPad5 = Mary)
2. Took a picture of each child holding a dry erase board with their iPad number written on it
3. Set the picture as the wallpaper on each of their iPads
Now, no matter who picks up the iPad, they will know to whom it “belongs” and what slot it goes into to be charged.

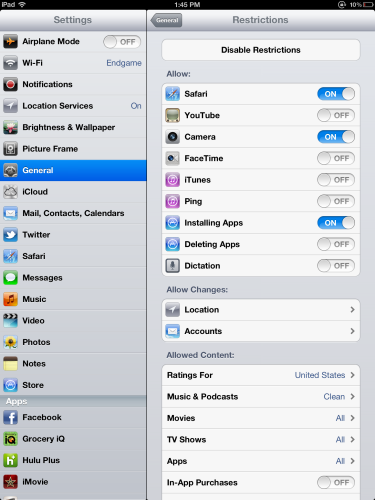
Once I’d assigned the iPads to my littles, I set up the restrictions by going to “Settings” and “General.” This takes a while to accomplish on each iPad, but is worth it for the children’s safety and your sanity (you can prevent them from deleting apps and making in-app purchases). Here is a screenshot of the restrictions I chose:
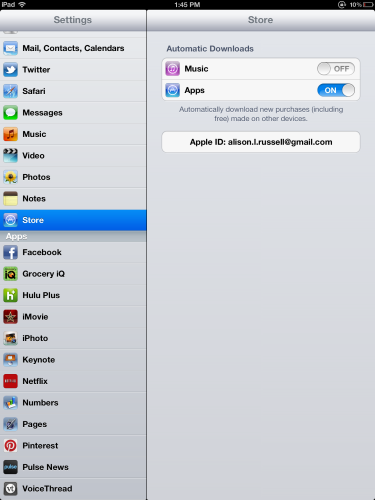
On each iPad, I then went through and logged into the one school-owned apple ID that I would be using to download apps (I logged in by going to “Settings,” then “Store”). Next, I turned automatic app downloads to “on”. This way, I can login to the apple ID from my iPad, download an app, and the apps will automatically download to ALL the student iPads!! Although this requires some up-front setup, it will definitely be worth your time.
Whew! This took quite some time, but once I had the styluses ready…the headphones organized…the wallpaper on each iPad as a picture of the child and his/her number…the restrictions turned on…and the automatic downloads turned on….then it was time to download apps! I went through and downloaded the free apps I had picked out, and when I came back to school the next morning, they had all loaded to all the iPads. So worth all the work!
And then it was play time! The kids were so excited to use the iPads for the first time – I just picked a simple app for them to try out, and they had a ball. I can’t wait to use them again next week during math stations!
To see more of our classroom adventures, follow me here on Instagram. Happy teaching!
Disclosure: This post contains an Amazon affiliate link.


Thanks for sharing the setup of the iPads. I’m getting a classroom set this week and these steps are very helpful. I will keep checking your BLOGS for more on the iPads. Could you add a list of your favorite apps? Thanks so much.
So glad it was helpful to you and congrats on getting your first full set!! I’ll have more posts coming soon about iPads and apps, so definitely check back or subscribe. Good luck to you!!